DIY Felt Mice: How to Make an Adorable Handmade Cat Toy
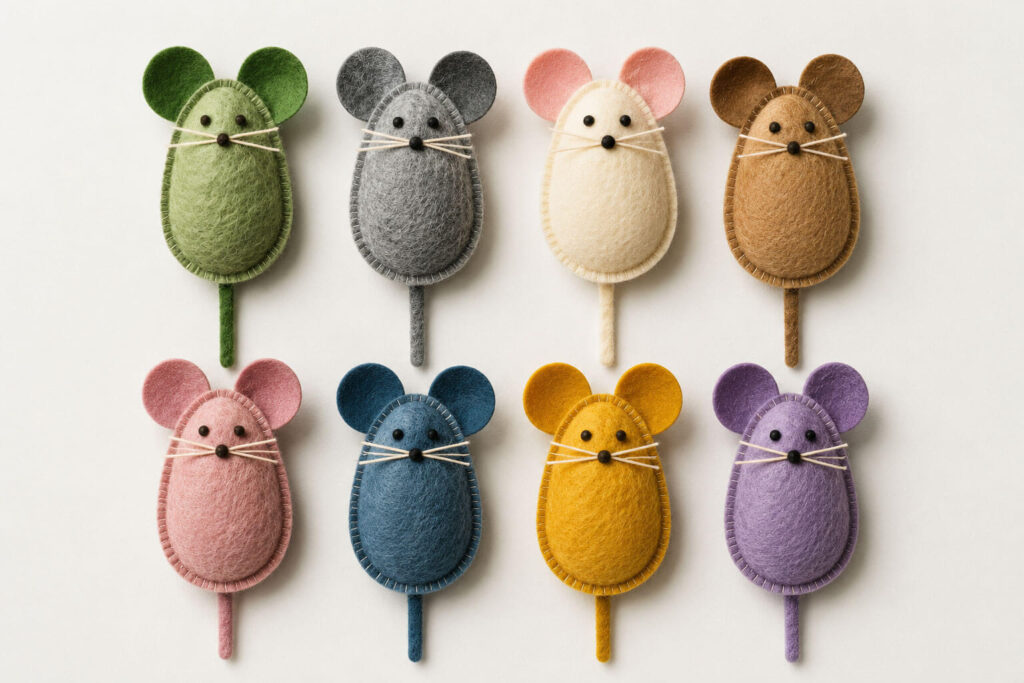
If you’ve ever watched your cat go absolutely feral over a simple mouse-shaped toy, you already know the appeal. There’s something about the size, the shape, and the way it skitters across the floor that triggers every hunting instinct your feline has. The good news? You don’t need to buy these toys — you can make them yourself, and they’ll probably turn out even better than the store-bought version.
This guide walks you through a complete DIY project for making felt mice cat toys from start to finish. By the end of this article, you’ll have all the skills and confidence you need to build a whole litter of these toys for your cat (or for gifting to other cat owners, because trust us, they’ll ask where you got them).
Why Make Your Own Felt Mice Cat Toys?
Before we get into the how, let’s talk about the why. Felt crafts have exploded in popularity over the last few years, and cat toys are one of the most practical, rewarding projects you can tackle with this material. Here’s why:
Felt is cheap and forgiving. A single sheet of felt costs less than a dollar in most craft stores, and you can get four or five mice out of it. Compare that to the $3–8 you’d pay per toy at a pet store, and the savings add up fast — especially if your cat is the type to destroy a toy within a week (we’ve all been there).
You control the quality. Many mass-produced cat toys are stuffed with synthetic fibers of questionable origin, glued with unknown adhesives, and sometimes contain small plastic parts that pose a choking hazard. When you make your own felt mice, you know exactly what’s inside — and you can customize the stuffing, the size, and even add catnip for extra appeal.
It’s a genuinely fun, low-stress craft. Unlike some DIY projects that require power tools or a steep learning curve, felt mice are hand-sewing projects that almost anyone can complete in an afternoon. They’re a great introduction to felt crafts in general, and a wonderful project to do with kids (with supervision around needles, of course).
Handmade toys make excellent gifts. If you know someone with a cat — and honestly, who doesn’t these days — a handmade felt mouse is a thoughtful, inexpensive gift that shows real effort. Etsy sellers charge upwards of $10–15 for toys just like the one we’re about to teach you to make.
What You’ll Need: Materials and Tools
Before diving into the tutorial, gather your supplies. This is a beginner-friendly DIY project, so most of these items are things you may already have around the house, or can pick up cheaply.
Materials
- Wool or wool-blend felt in your chosen colors (green, gray, and cream are classic “mouse” colors, but cats don’t care about realism, so feel free to get creative)
- Embroidery thread or strong sewing thread in a matching or contrasting color
- Polyester fiberfill stuffing (or wool stuffing for a more natural option)
- Small beads or embroidery floss for the eyes
- A tiny pom-pom or wrapped thread nose in brown or black (optional. You can also use a large-hole bead for the nose, which allows you to thread the mouse’s whiskers through it)
- Twine, yarn, or leather cord for the tail (optional. You can also cut the mouse’s tail from felt. The pattern is included with the mouse tail template, which you can cut out and sew onto the body)
- Fabric glue (a strong, flexible fabric glue is essential for the ear-shaping technique we’ll cover below)
- Dried catnip (optional, but highly recommended — this is what turns a “toy” into an “obsession”)
Tools
- Sharp fabric scissors
- A hand-sewing needle (embroidery needles work well because of their larger eye)
- A pencil or fabric marker for tracing your pattern
- Tweezers (helpful for stuffing small spaces)
If you don’t already have wool felt on hand, look for 100% wool or wool-blend felt sheets, since synthetic craft felt tends to fray and pill much faster — not ideal for a toy that’s about to be batted around, chewed, and dragged across the living room floor. A multi-pack of wool felt sheets in assorted colors is a smart investment since you’ll likely want to make more than one mouse.
Browse wool felt sheets on Amazon
For the stuffing, a bag of polyester fiberfill will last you through dozens of toys and other felt crafts projects down the line.
Browse polyester fiberfill on Amazon
And if you want your mouse to be an instant hit, don’t skip the catnip.
Step 1: Create and Cut Your Pattern
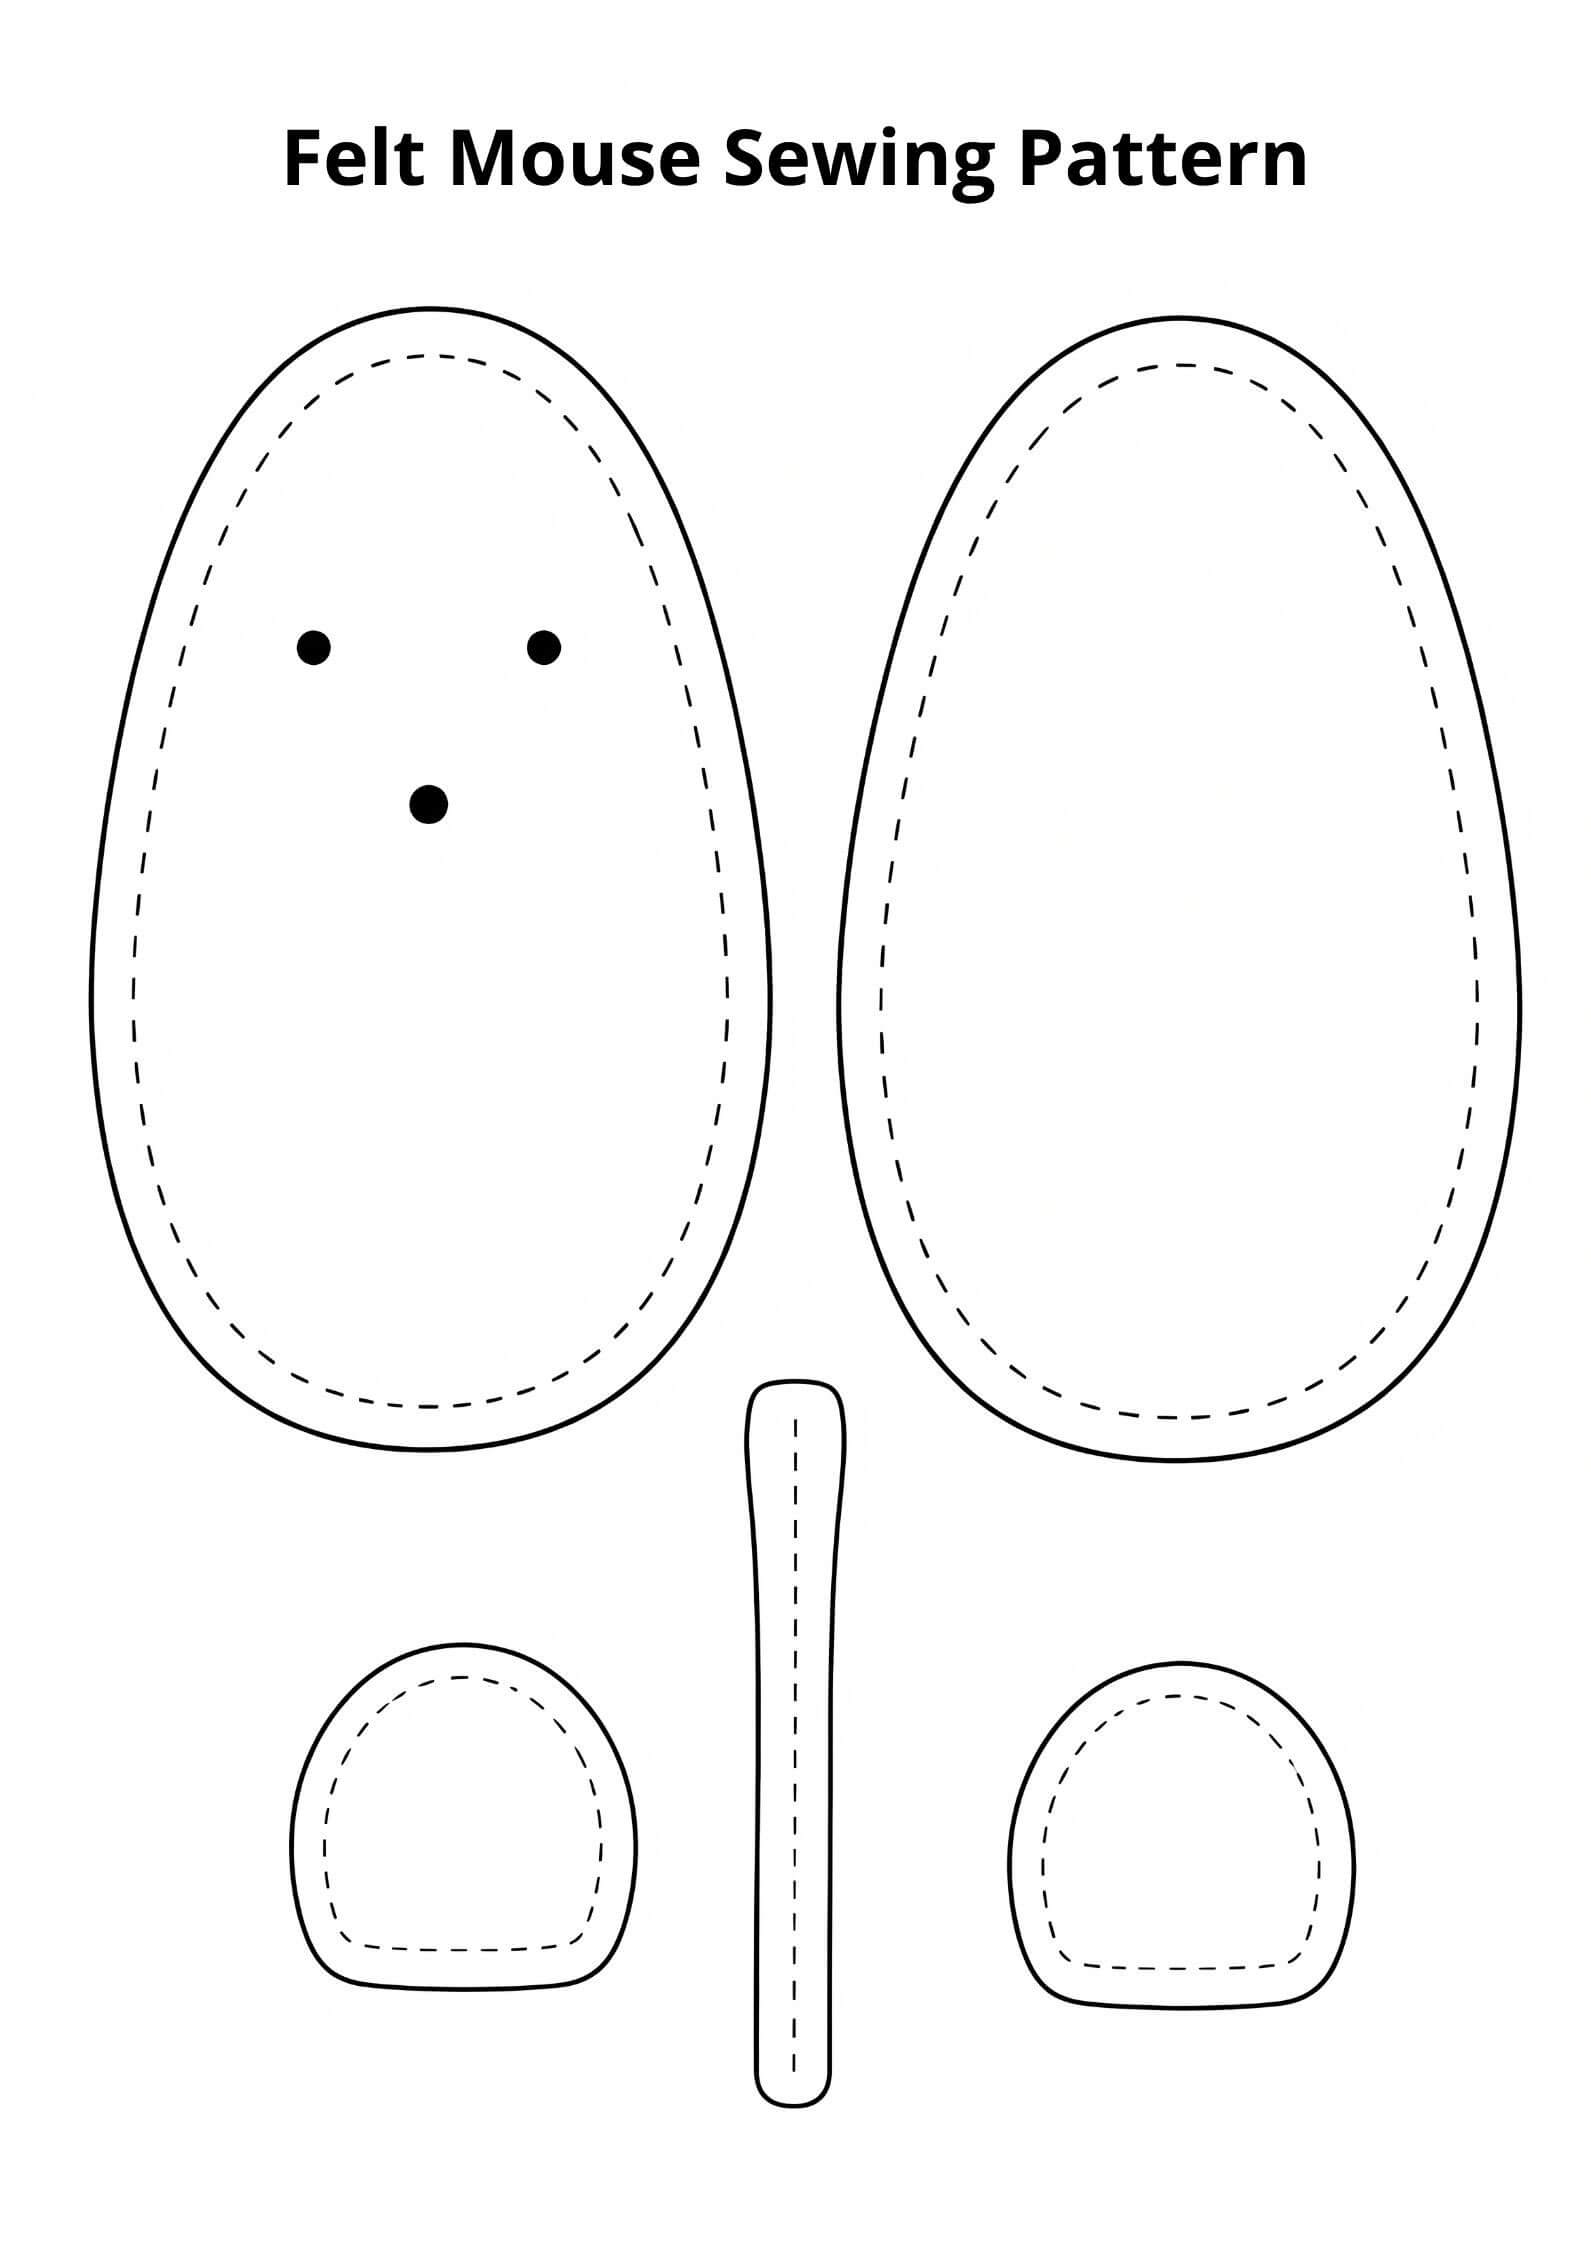
Start by sketching or printing a simple mouse-body template. The classic shape is a teardrop or elongated oval — narrower at the head and slightly rounder at the back, similar to the shape of a real mouse’s body when curled up. You’ll need:
- Two body pieces (mirror images, since you’re sewing the front and back together)
- Two ear pieces (we’ll get to the special shaping technique in the next section)
- One tail piece (a long, thin strip of felt, twine, or cord)
Pin your paper pattern to the felt and cut carefully, following the lines exactly. Precision here matters more than it seems — a slightly wonky outline won’t be very noticeable once the mouse is stuffed and sewn, but sloppy cutting can make the seams pucker or the final shape look lopsided.
A Quick Tip on Fabric Choice
If you’re using two different felt colors (a darker shade for the outer edge and ears, and a lighter shade for the body, like in the classic green two-tone mouse design), cut each piece from its designated color now, before moving on. This is a small detail, but it’s exactly what gives handmade felt mice that professional, polished look you see in higher-end pet boutiques.
Step 2: The Secret to Realistic, Curved Ears
This is the step that separates an average felt mouse from a genuinely great one — and it’s the part most tutorials skip over or gloss past. If you look closely at a well-made felt mouse (or the reference photo you’re working from), you’ll notice the ears aren’t flat ovals glued flat onto the head. They have a subtle 3D curve, almost like a tiny satellite dish, which makes the toy look far more lifelike and adds a nice tactile dimension for your cat to paw at.
Here’s exactly how to achieve that curved-ear effect:
Step-by-Step Ear Shaping Technique
- Cut your ear shape first. Start with a simple rounded oval or teardrop shape, slightly larger than you think you’ll need — you’ll lose a small amount of width once you shape it.
- Make a straight cut from the outer edge toward the center. Using sharp small scissors, cut a single straight slit starting at the bottom outer edge of the ear and stopping about one-thirds of the way toward the middle. Do not cut all the way through — you want the two sides of the slit to still be attached at the top.
- Overlap the two cut edges. Take the two sides of the slit you just created and gently overlap one edge over the other, like closing a paper fan slightly. This is what creates the dome or cone-like curve. Overlap them by about 1/8 inch (2–3 mm) (adjust to taste — more overlap means a deeper, more pronounced curve).
- Glue the overlap in place. Apply a small dot of fabric glue between the overlapped layers and press firmly for 20–30 seconds until it holds. Let it dry completely before handling further — rushing this step is one of the most common mistakes, and it can cause the ear to pop back flat later.
- Repeat for the second ear. Consistency matters here — try to overlap the same amount on both ears so your mouse doesn’t end up with one flatter ear than the other.
This same dart-and-overlap technique is used throughout felt crafts and plush-making more broadly (it’s how professional plush toy makers give ears, petals, and other rounded features their dimension), so once you’ve mastered it here, you’ll be able to apply it to future projects too — flowers, other animal toys, even fabric bowls.
A helpful troubleshooting tip: if your ear looks too flat after gluing, you probably didn’t overlap enough felt. If it looks too tightly curled or cone-shaped, you overlapped too much. Don’t be afraid to experiment on a scrap piece of felt before committing to your final mouse — this is a technique that benefits enormously from a quick practice run.
Step 3: Sew the Ears to the Head
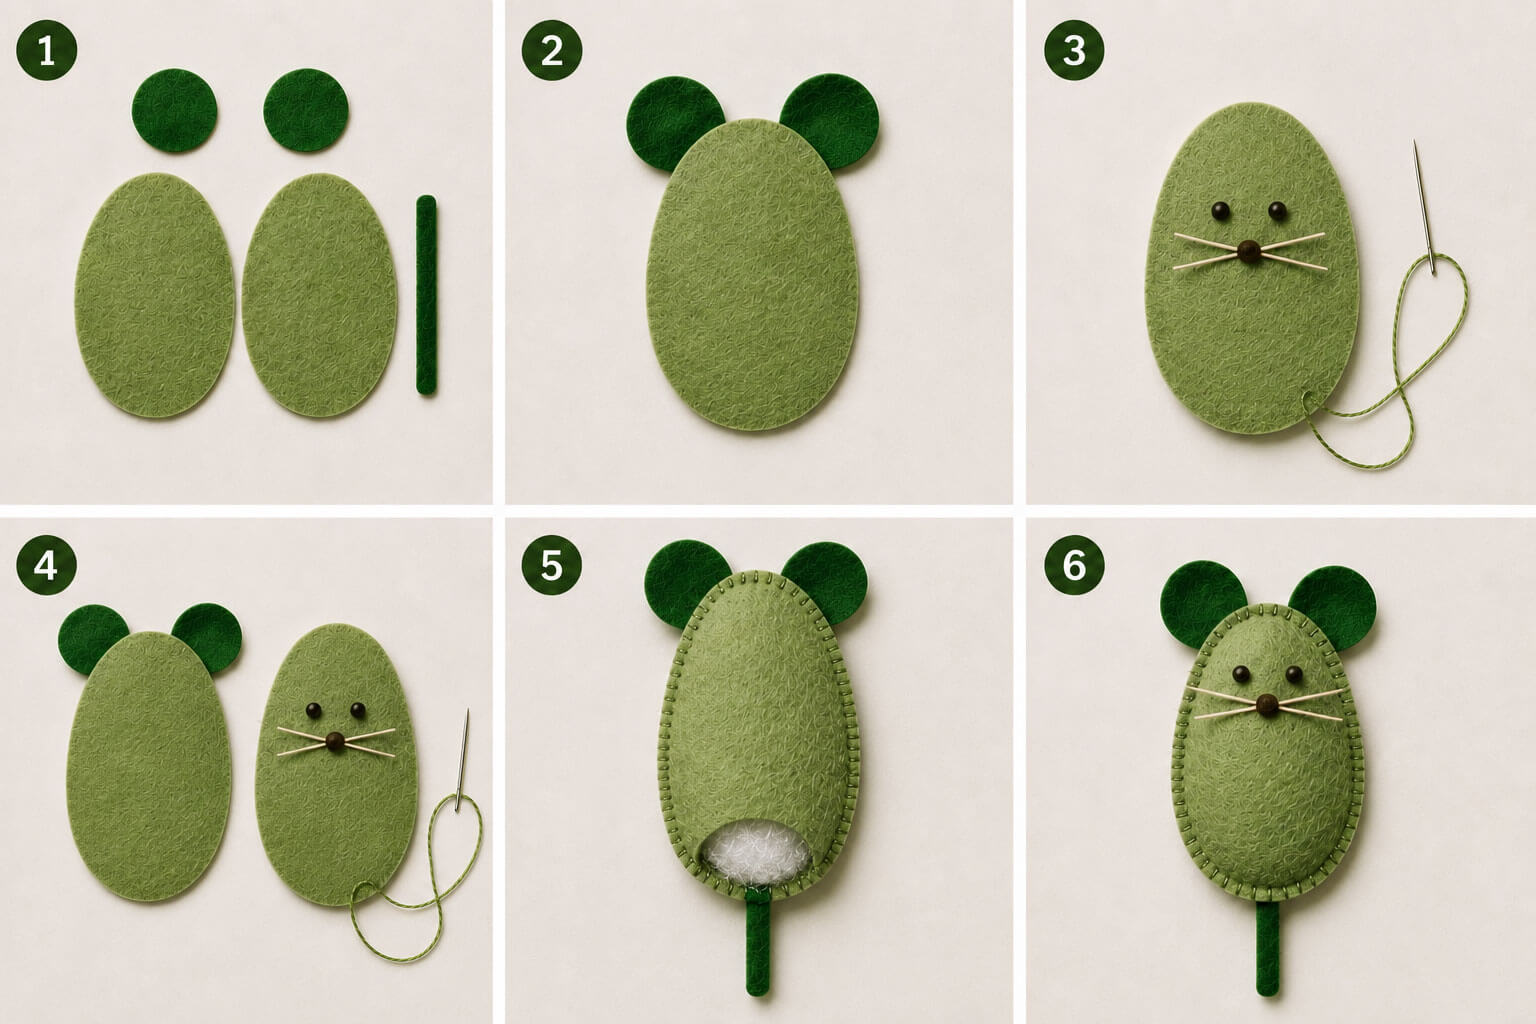
Once your curved ears are fully dry and holding their shape, it’s time to attach them. Position each ear where you want it on one of your two body pieces (this will become the “front” of your mouse’s head), angling them outward slightly for a natural, alert look.
Using a simple whip stitch or blanket stitch, sew along the bottom, straight edge of each ear to attach it to the body piece. Keep your stitches small and close together so the ear stays firmly anchored — this is a high-stress point once your cat starts batting the toy around, so a weak attachment here is a common point of failure.
Step 4: Add the Face
With the ears attached, it’s time to give your mouse some personality. This is a purely aesthetic step, but it’s the part that makes each mouse feel unique and gives it real charm.
- Eyes: Sew on two small dark beads, or use a few tight wraps of black or dark brown embroidery thread to create simple French knot eyes. Keep them close together and just below the ears for the most endearing “mouse” expression.
- Nose: A tiny wrapped-thread knot or small pom-pom in brown works well.
- Whiskers: This step is optional but adds a wonderful finishing touch. Cut two or three lengths of embroidery thread, fishing line, or thin twine, and tuck them into the seam on either side of the nose before you sew the body closed. They’ll be secured permanently once the seam is stitched.
Step 5: Sew the Body and Stuff Your Mouse
Now place your two body pieces together, right sides facing out (felt doesn’t have a “wrong side” the way woven fabric does, which is part of what makes it such a beginner-friendly material).
Starting at the bottom of the body, begin sewing around the outer edge using a whip stitch or blanket stitch, working your way up one side, around the head, and partway down the other side. Leave a two- to three-inch gap unsewn — this is where you’ll add the stuffing.
Once your gap is in place:
- Use small pinches of fiberfill to stuff the mouse, working the stuffing into the ears, head, and body evenly with your fingers or tweezers.
- If you’re adding catnip, mix a small pinch directly into the stuffing at this stage, or tuck a small fabric sachet of catnip into the center of the stuffing so it doesn’t spill out through the seams over time.
- Don’t overstuff — a mouse that’s packed too tightly will feel stiff and won’t have the soft, squeezable texture cats seem to love. Aim for a firm-but-pliable feel, similar to a stress ball.
Once you’re happy with the stuffing level, tuck in the tail piece at the base of the body (or attach it separately with a few secure stitches after closing the seam), and finish sewing the gap closed.
Step 6: Attach the Tail
If you didn’t sew the tail into the closing seam, attach it now with several small, tight stitches at the base of the body. A piece of jute twine, yarn, or thin leather cord makes an excellent tail — it has enough weight to give the toy a satisfying flick when your cat swats it, and it holds up well to chewing.
Common Mistakes to Avoid
Even simple DIY projects have their pitfalls. Here are the most common issues crafters run into with this particular project, and how to sidestep them:
- Skipping the practice ear. As mentioned above, the curved ear technique takes a little trial and error. Don’t skip the practice run on scrap felt — it will save you from unpicking stitches later.
- Using synthetic felt. Cheap acrylic felt frays quickly and doesn’t hold its shape as well under a cat’s rough play. Wool or wool-blend felt is worth the small extra cost.
- Overstuffing. A too-firm mouse loses the soft, squishable quality that makes it appealing to bat around and “kill.”
- Weak seams. Cats can be surprisingly strong with their paws and teeth. Use a tight whip or blanket stitch, and consider doubling your thread for extra durability.
- Forgetting safety. If you use small beads for eyes, make sure they’re sewn on extremely securely, or consider embroidering the eyes instead. Cats that are aggressive chewers can dislodge poorly secured small parts, which poses a choking risk. When in doubt, embroidered features are the safer choice for heavy-play households.
- Rushing the glue on the ears. Give the fabric glue the full recommended drying time before you start sewing the ears onto the head — impatience here is the number one reason ears end up lopsided or flat.
Customization Ideas
Once you’ve made your first felt mouse and gotten comfortable with the technique, the fun really begins. Here are a few ways to make each one unique:
- Vary the size — miniature mice for kittens, larger ones for bigger cats who like to really wrestle with their toys
- Try different color combinations — gray and white for a “realistic” mouse, or bright pink and purple for something more playful
- Add a bell — sew a small jingle bell into the body before closing the final seam for an audio element that many cats find irresistible
- Make a whole family — batches of felt mice in coordinating colors make a lovely handmade gift set for cat-owning friends
If you plan on making these regularly (and once your cat gets hooked, you probably will be), it’s worth picking up a small toolkit dedicated to the craft — a pair of fine embroidery scissors, a needle organizer, and a proper crafting glue will make each subsequent mouse faster and neater to assemble.
Browse embroidery and sewing kits on Amazon
Final Thoughts
Making your own felt mice is one of the most satisfying felt crafts projects out there precisely because the payoff is so immediate and enthusiastic — there’s nothing quite like watching your cat go wild over something you made with your own two hands. The curved-ear technique covered in this guide takes a bit of practice, but once you’ve got it down, you’ll notice a real difference between your homemade toys and the flat, mass-produced versions sold in stores.
Whether you’re making a single mouse to spoil your own cat or a whole batch for gifts, this is a DIY cat toy project that rewards patience, a little precision, and a willingness to experiment. Grab your felt, thread a needle, and get ready to become your cat’s new favorite toymaker.