DIY Outdoor Cat Water Station: Keep Your Cat Hydrated All Summer Long
If you have an outdoor or indoor-outdoor cat, you already know that summer heat brings one urgent challenge: keeping your cat properly hydrated. Cats are notoriously bad at drinking enough water on their own, and when temperatures climb, dehydration and heatstroke become real risks. A well-designed outdoor cat water station solves this problem by giving your cat (and possibly visiting neighborhood cats, strays, or wildlife) constant access to clean, cool water without you having to refill bowls every few hours.
This guide walks you through everything you need to know to build your own outdoor cat water station — from choosing materials and location to maintenance tips that will keep the water fresh even during the hottest weeks of summer.
Why Outdoor Cats Need a Dedicated Water Station
Cats evolved from desert ancestors, which is part of why they have a low thirst drive compared to dogs. In the wild, cats got most of their hydration from prey. Domestic cats, especially those that eat dry kibble, often don’t drink enough water voluntarily. Add outdoor heat, physical activity, and direct sun exposure, and the risk of dehydration rises sharply.
An outdoor cat water station matters for a few key reasons:
- Summer heat increases water loss. Cats lose moisture through panting and skin evaporation, especially during hot afternoons.
- Standing water in a regular bowl gets warm and stagnant fast, which makes cats less likely to drink it.
- Outdoor bowls attract debris, insects, and algae, which can make cats avoid the water entirely or get sick from contaminated water.
- A consistent, reliable water source reduces the risk of heatstroke, urinary tract issues, and kidney strain, which are all aggravated by inadequate hydration.
Building a dedicated station addresses all of these issues at once, and it’s a project you can complete in an afternoon with basic tools and inexpensive materials.
Planning Your Cat Water Station: Key Considerations
Before you start building, think through a few basics that will shape your design.
1. Location Matters
Choose a spot that is shaded for most of the day, away from direct afternoon sun, but still in an area your cat naturally visits. A spot near a porch, under a tree, or beside a shed works well. Avoid placing the station near busy roads or where it could attract unwanted wildlife conflicts. If you have multiple cats or know strays visit your yard, consider creating two stations in different locations to reduce competition and stress.
2. Stability and Tip-Resistance
Outdoor stations get bumped by wind, raccoons, birds, and the cats themselves. Choose containers with a wide, heavy base, or anchor the entire station to the ground using stakes, bricks, or a weighted base plate.
3. Material Safety
Stick to food-grade plastic, stainless steel, or ceramic. Avoid containers that previously held chemicals, paints, or cleaning products, even if you think you’ve rinsed them thoroughly.
4. Capacity vs. Maintenance
A larger reservoir means less frequent refilling, which is especially helpful in summer when water evaporates faster and you may not be home every few hours. However, larger containers are heavier to clean. Find a balance based on how often you can realistically check the station — daily is ideal in summer.
Materials You’ll Need
This project is intentionally low-cost and flexible. Here’s a basic materials list for one of the most popular and effective DIY designs: the gravity-fed water station.
- A large food-grade plastic bottle or jug (2-liter soda bottles or large water jugs both work well)
- A bowl with sides at least 3-4 cm tall, wide enough to hold the bottle upright (a deep saucer-style planter base or a small basin works great)
- A drill or a heated nail/awl for making a small hole
- Bricks, pavers, or a flat paving stone to keep the bowl steady on the ground
- Shade cloth, a small tarp, or natural shade (tree branches, a doghouse roof) for sun protection
- Optional: a solar-powered fountain pump for a circulating version
If you prefer a simpler version, you only need a wide bowl and a way to provide shade — but the gravity-fed reservoir is the real game-changer for hands-off summer hydration.
Step-by-Step: Building a Gravity-Fed Outdoor Cat Water Station
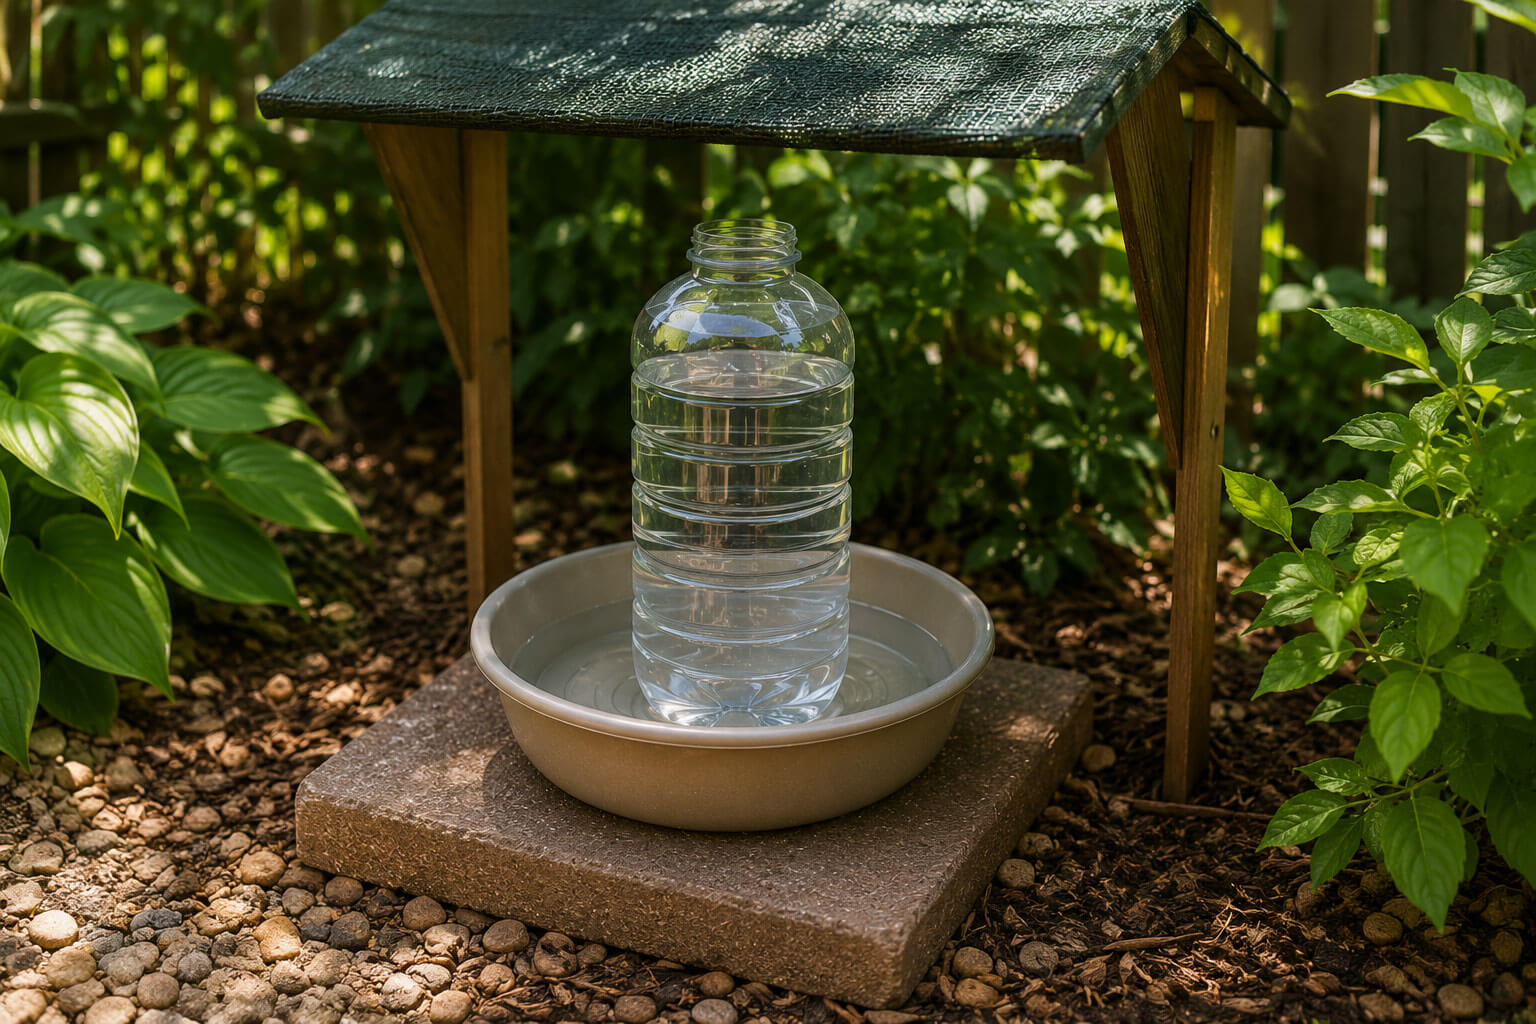
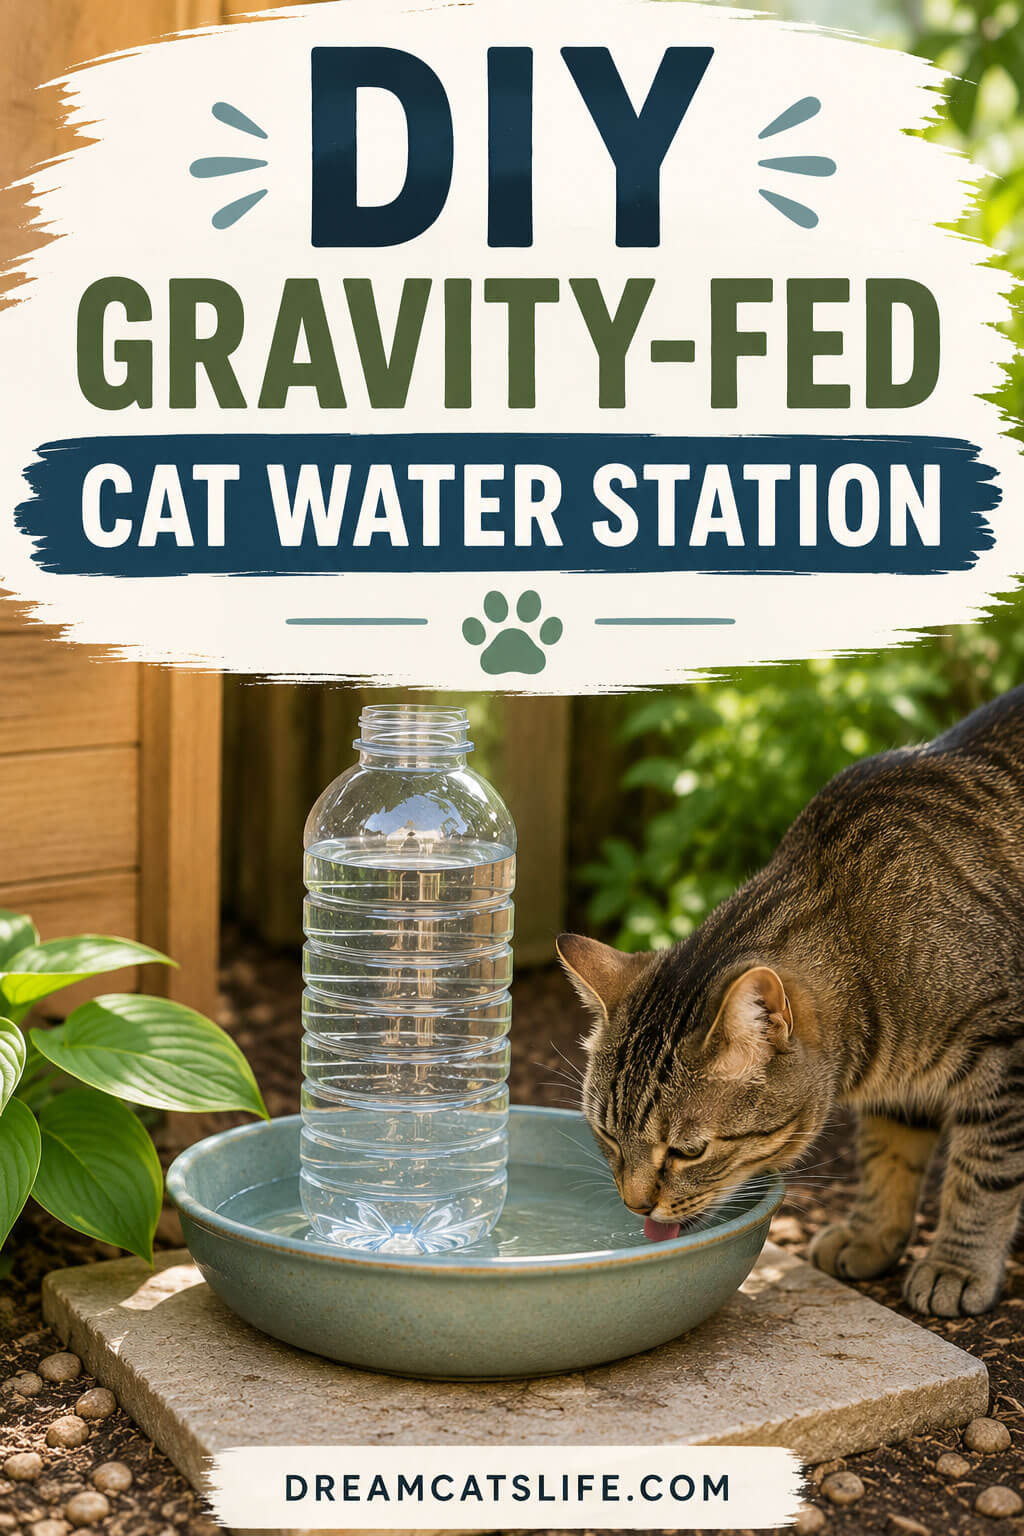
This design uses the same principle as old-fashioned chicken waterers: a sealed reservoir bottle standing upright in a shallow dish, with a small hole that releases water automatically as the cat drinks. The best part is that this version requires no drilling brackets, no bottle cutting, and no extra stand — just a bottle, a tall-sided bowl, and a few minutes of setup.
Step 1: Prepare the Reservoir Bottle
Take a clean plastic bottle — a 2-liter soda bottle or a large water jug both work well, with bigger bottles being better for multi-cat households. Wash it thoroughly with hot water and a small amount of dish soap, then rinse until there is zero soap residue, since any leftover soap can make cats avoid the water or cause stomach upset.
Near the bottom of the bottle, about 2 cm (roughly three-quarters of an inch) above the base, drill or puncture a small hole, around a quarter-inch in diameter. This hole is what controls the water flow once the bottle is set up.
Step 2: Fill and Seal the Hole with Your Finger
Simply cover the hole with your finger or thumb to stop any water escaping. Fill the bottle completely with fresh, cool water while keeping the hole sealed.
Step 3: Set It Into the Bowl
Choose a bowl with sides at least 3-4 cm (about 1.5 inches) tall — this height matters because it needs to rise above the hole once the bottle is standing in it. Stand the filled bottle upright inside the bowl, keeping your finger over the hole until the bottle is steady and in position.
Step 4: Release Your Finger
Once the bottle is standing securely, lift your finger off the hole. Water will flow out of the bottle and fill the bowl. As the water level in the bowl rises, it eventually reaches the height of the hole, sealing it off from the outside air and stopping the flow automatically. From that point on, the system works just like a gravity-fed waterer: as your cat drinks and the water level drops below the hole, a small amount of air enters the bottle and lets a bit more water trickle out, keeping the bowl topped off for hours or even days without you needing to do anything.
This method skips all the cutting, drilling brackets, and stands of more elaborate designs — the upright bottle balances on its own inside the bowl, and gravity and air pressure do the rest. Just make sure the bowl sits on a flat, stable surface so the bottle doesn’t tip.
Step 5: Add Shade
Cats are far more likely to drink water that stays cool. Position the entire station under natural shade if possible. If your chosen spot doesn’t have shade, build a simple cover using:
- A small wooden lean-to roof
- A scrap of shade cloth stretched over a frame
- An upside-down planter saucer with legs, propped above the station
- A repurposed doghouse roof or umbrella
This single addition dramatically extends how long the water stays cool and clean, and it also protects the reservoir bottle from UV degradation, since direct sunlight can break down plastic over time and promote algae growth inside the bottle itself.
Step 6: Secure Against Wildlife and Wind
To prevent raccoons, birds, or squirrels from tipping over the station, consider anchoring the base bowl with a few small screws into a wooden platform, or use a heavier ceramic bowl that’s harder to knock over. If local wildlife is a major concern, you can build a simple low fence or barrier around the station using wire mesh, leaving gaps just large enough for cats to access but small enough to slow down larger animals.
Alternative Design: Solar-Powered Circulating Fountain
If you want to go a step further, a small solar-powered fountain pump can keep water moving, which helps prevent mosquito breeding, algae growth, and stagnant odors — all common summer problems with standing water.
To build this version:
- Use a wider, shallow basin (a repurposed plant saucer or small basin works well).
- Place a small solar fountain pump (widely available online and inexpensive) in the center or at one edge.
- Fill the basin with water and position the pump’s solar panel in a sunny spot nearby, with the cord running to the basin in the shade.
- Add a few flat stones for cats to perch on while drinking, which also helps moderate water depth in case of light rain runoff.
This circulating design requires slightly more setup and a small upfront cost for the pump, but it significantly reduces maintenance because moving water stays fresher for longer and is naturally more appealing to cats, who are instinctively drawn to running water over stagnant water.
Keeping the Water Station Clean and Safe All Summer
A water station is only useful if it stays clean. Bacteria, algae, and mosquito larvae can build up quickly in hot weather, sometimes within just two or three days. Follow this maintenance routine to keep things safe:
Daily Checks
- Glance at the water level and clarity each day, especially during heat waves when evaporation speeds up.
- Look for debris like leaves, dirt, or insects that may have fallen in overnight.
Every 2-3 Days
- Dump out the bowl completely and scrub it with a bottle brush or sponge using hot water (no soap residue should remain).
- Refill the reservoir bottle with fresh, cool water.
- Check the gravity-feed hole for any blockages or mineral buildup.
Weekly Deep Clean
- Disassemble the entire station and wash all components with a mild vinegar-water solution (one part white vinegar to four parts water) to remove algae and mineral deposits, then rinse thoroughly.
- Inspect the reservoir bottle for cracks or cloudiness, and replace it if the plastic has degraded from UV exposure.
- Check the shade structure for stability and repair as needed after storms or high winds.
Mosquito Prevention
Standing water in summer is prime mosquito breeding territory. The circulating fountain design largely avoids this issue, but for the gravity-fed bowl version, changing the water every two to three days breaks the mosquito breeding cycle, since it takes roughly a week for larvae to mature. If mosquitoes remain a persistent problem in your area, consider switching to the solar fountain design, since moving water is far less hospitable to mosquito larvae.
Tips for Encouraging Your Cat to Use the Station
Sometimes cats are slow to adopt a new water source, even when it’s more convenient than their old bowl. A few tricks can help:
- Place it near existing food or resting spots your cat already frequents, since cats are creatures of habit and routine.
- Keep the original water bowl nearby for the first week, then gradually phase it out once your cat starts using the new station consistently.
- Add a few ice cubes during the hottest part of the day to keep the water extra cool and entice your cat to investigate.
- Avoid scented soaps or cleaners anywhere near the station, since cats have a heightened sense of smell and may avoid water that carries any chemical residue.
- Consider water depth and bowl shape. Some cats dislike bowls where their whiskers touch the sides, so a wide, shallow bowl is generally more appealing than a narrow or deep one.
Seasonal Considerations Beyond Summer
While this project is designed with summer heat in mind, a few adjustments make it useful nearly year-round:
- In early fall, you can keep the same setup but reduce cleaning frequency since evaporation and bacterial growth slow down with cooler temperatures.
- In winter, in regions that freeze, you’ll either need to bring the station indoors overnight or invest in a small heated outdoor pet bowl, since the gravity-fed design isn’t compatible with freezing temperatures.
- In spring, inspect all components for wear after winter storage and refresh any cracked or sun-damaged parts before the heat returns.
Budget Breakdown
One of the best parts of this project is how affordable it is. Here’s a rough cost estimate if you’re starting from scratch:
- Recycled bottle or jug: free (reused from household items)
- Shallow bowl or saucer: $5-15 if purchased new, free if repurposed
- Bricks or pavers for stability: $5-10, or free if you already have some on hand
- Shade cloth or small tarp: $8-15
- Optional solar fountain pump: $15-30
In total, you can build a fully functional outdoor cat water station for under $20, or completely free if you use materials you already have around the house.
Final Thoughts
A DIY outdoor cat water station is one of the simplest, most impactful projects you can take on to protect your cat’s health during the hottest months of the year. With just a few inexpensive materials and an afternoon of effort, you can create a reliable, low-maintenance water source that keeps your cat properly hydrated, reduces the risk of summer heat-related illness, and gives you peace of mind whether you’re home or away. Whether you go with a simple shaded bowl, a gravity-fed reservoir, or a solar-powered circulating fountain, the most important thing is consistency: check it daily, clean it regularly, and position it somewhere shaded and accessible. Your cat — and possibly a few grateful neighborhood visitors — will thank you all summer long.